| This article first appeared in Mugwumps magazine in November, 1974, Vol 3, #6. Be sure to read the Disclaimer and the Addendum at the bottom of the page. |
 An idea, centuries old has returned to make learning to play such instruments as the fretless banjo a bit easier.
A family of instruments called the viols, popular for several hundred years up to the mid-18th century, was fretted -- but not with the sorts of frets seen on modern banjos, mandolins, or guitars. Instead, players tied lengths of gut or hard twine around the neck at appropriate places, and stopped the strings against these, in order to get the clearer, more accurate notes this arrangement produced.
![]()
Placement of the frets on the fingerboard is too involved a subject to be dealt with here1; but tying the fret onto the neck so that it will stay, is a simple, easily learned skill.
Select the fret material. I have found that monofiliment nylon fishing line (10 to 15 lb. test) works well. Thinner line gives a less definite note.
- Cut off about 2 feet of line and form it into a single loop.
- With the instrument neck horizontal and the peghead to the left, slip the loop up in back of the neck and drape it over the front (fig. A).
- Take one of the single ends and, making a loop of it, put that loop through the first loop (fig. B).
- Then take the other free end and run it through the second loop (fig. C).
- Take the free ends and snug them down tight and the fret knot is complete.
- Putting a simple overhand knot on top (fig. D) helps keep the fret knot in place.
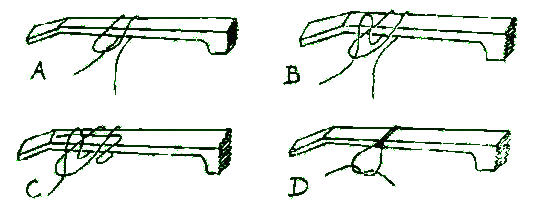
 The fret as tied consists of two pieces of line, side by side. Before snugging down the knot for the last time, be certain that the two strands are parallel. For neatness sake, I try to locate the knot on the front of the neck, about 1/4" below the fingerboard, which is less in the way.
Fret placement is critical. I have learned that when the proper fret position is found, it is a good idea to file two unobtrusive "V" notches at either side of the fingerboard, so that the snugged-down fret knot will not budge.2
 1The easiest way to determine fret spacing is to lay another (fretted) banjo neck next to the fretless and transfer the fret placement from one to the other. Then move the bridge of the fretless so that it is as far from the 12th fret as the 12th fret is from the nut. If you wish to determing your own scale length and fret spacing, divide the distance from the nut to the bridge by 17.835 (for simplicity 18 will do and then move the frets slightly by ear) which gives the distance from the nut to the first fret. Then divide the remaining distance by the same number, which gives you the distance from the 1st to the 2nd fret, and so on up the neck. The 12th fret should be exactly in the middle, between the nut and the bridge. Since yours is a fretless and you are not sinking the frets into slots cut into the fingerboard, you can correct minor errors by ear.
2Disclaimer: Mugwumps does not advocate cutting notches in the necks of instruments; the fret knots hold without them.
ADDENDUM:
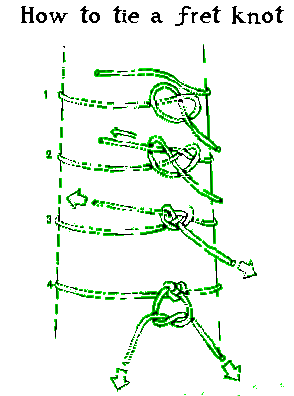
Another system for tying fret knots is shown below. I don't remember where I saw it. MIH
![]() Attention Webmasters: You are welcome to link to this article from your website, crediting the source, but you may not copy it and post it or any part thereof, including the banjoists graphics, at your site. Thank you for your cooperation.
Attention Webmasters: You are welcome to link to this article from your website, crediting the source, but you may not copy it and post it or any part thereof, including the banjoists graphics, at your site. Thank you for your cooperation.